Tutorial
How to build your own emulator with the SPECTRUSTY library.
This project is maintained by royaltm
SPECTRUSTY Tutorial
This is a part of the tutorial for the SPECTRUSTY library.
In this step, you can learn how to build a minimal working emulator.
Step 1 - Baby steps
First, let’s prepare your Rust crate then add the following to the Cargo.toml of your project:
[dependencies]
spectrusty = "0.1"
To make this super easy, let’s say we want to build a bare ZX Spectrum 16k without any peripherals.
What we need is a CPU, some memory, and a chipset.
Let’s define a struct for holding our components:
use spectrusty::z80emu::{Cpu, Z80NMOS};
use spectrusty::chip::{ControlUnit, MemoryAccess, ula::UlaPAL};
use spectrusty::memory::Memory16k;

struct ZxSpectrum16k {
    cpu: Z80NMOS,
    ula: UlaPAL<Memory16k>
}
As you can see, there is a lot of imports involved… and there’ll be much, much more. While you could use the glob * facility instead, this way, you can better see where each component originates from.
So far, we have added a CPU type and a chipset with the concrete memory. The Memory16k type is declared in place of the chipset’s generic parameter - M.
Ula implements the heart of one of ZX Spectrum 16k or 48k version, and UlaPAL is a slightly more specialized type for the 50Hz PAL version.
But what if you wanted to use another type of memory or a CPU while reusing the same code?
We can refactor our struct slightly so it can also accept generic parameters:
// ... more imports going in order
use spectrusty::memory::{ZxMemory, Memory16k, Memory48k};

#[derive(Default)]
struct ZxSpectrum<C: Cpu, M: ZxMemory> {
    cpu: C,
    ula: UlaPAL<M>
}

// Let's create some sugar definitions
type ZxSpectrum16k<C> = ZxSpectrum<C, Memory16k>;
type ZxSpectrum48k<C> = ZxSpectrum<C, Memory48k>;
Sooo.. we can use a different memory type and also a different CPU variant. For example: Z80CMOS.
Now for the main dish:
// we can always work on errors later, this is always an easy default
type Result<T> = core::result::Result<T, Box<dyn std::error::Error>>;

fn main() -> Result<()> {
    let spectrum = ZxSpectrum16k::<Z80NMOS>::default();
    //...
    Ok(())
}
In the later steps, I’ll show you how to make this struct accept other types of chipsets.
Finally, we have created an instance of a ZX Spectrum model.
But how exactly do we run it? And what does it even mean?
The spectrum object represents a kind of a Finite State Machine, perhaps even a Turing Machine. So by running it, I mean that the machine can alter its state by executing instructions.
The state of this particular FSM is being changed by executing the Z80 machine code that resides in its memory. So… it would be better to have some code loaded first before trying to run anything. Otherwise, the CPU will be executing a series of NOPs (0x00) followed by RST 38 (0xFF) in the upper 32kb RAM.
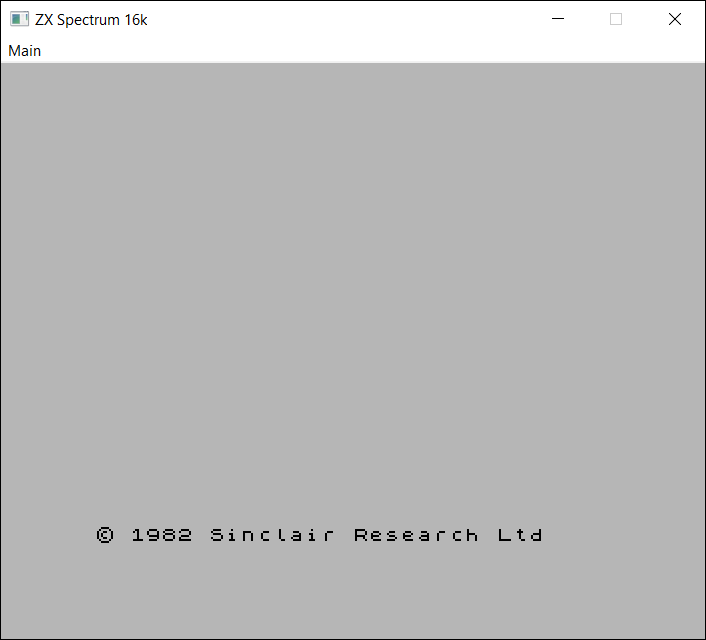
Let’s just load the original Spectrum’s ROM software into the emulated memory:
    let rom_file = std::fs::File::open("resources/roms/48.rom")?;
    spectrum.ula.memory_mut().load_into_rom(rom_file)?;
You may get a copy of a 48.rom file as Amstrad has kindly given open permission to re-distribute the Spectrum’s ROM content.
Now, can we finally run it?
Short answer: yes.
Long answer: yes, but how would you know if something is even happening inside the FSM? I think that you’d like to see and hear the side-effects of changes of the Spectrum’s internal state. It would be even better if you could provide it with some input, like keyboard presses.
Not only do we need to execute the Z80 code, but we also need to render some side effects and accept user input at the same time.
Well… we can start by observing how ULA generates its video signal.
In television sets and computer monitors, the entire front area of the tube is scanned repetitively and systematically from top to bottom by the electron beam. ULA provides color information for the raster beam while the screen is being produced. It does so for the fixed number of CPU cycles. Then repeats the whole process again and again.
A single pass of a raster beam is a video frame. The number of CPU cycles (or T-states that are being used as time units here) of every frame always stays the same.
Now it becomes obvious: the emulator should be run in a loop. First, it should run code for the constant number of cycles. Then from the collected data, it should render a video raster as an image and the sound as short audio samples. Then it should poll user input and pass it to the state machine. Rinse and repeat.
// yeah...more imports...
use spectrusty::video::{
    Video, Palette, PixelBuffer, BorderSize,
    pixel::{PixelBufA24, SpectrumPalRGB24}
};
use spectrusty::peripherals::{KeyboardInterface, ZXKeyboardMap};

fn main() -> Result<()> {
    //... ✂
    //... later in main()

    // here for simplicity we hard code the largest possible border
    let border = BorderSize::Full;

    while is_running() {
        spectrum.update_keyboard( update_keys );

        spectrum.run_frame();

        let (width, height) =
            <UlaPAL<Memory16k> as Video>::render_size_pixels(border);
        let (video_buffer, pitch) = acquire_video_buffer(width, height);
        spectrum.render_video::<SpectrumPalRGB24>(
            video_buffer,
            pitch,
            border);

        update_display();

        synchronize_frame();
    }
}
The PixelBuffer trait is for handling the way pixel colors are being placed into the byte buffers. There are a few implementations of PixelBuffer available in the video::pixel module for most common pixel formats. For the purpose of this example, we will use PixelBufA24 that defines a single color pixel as an array of 3 bytes representing: red, green, and blue channels. The SpectrumPalRGB24 is an implementation of the Palette trait providing particular colors.
Functions such as: is_running, update_keys, acquire_video_buffer, and update_display depend solely on the emulator host environment and is out of the scope of this library. The implementation for them should be provided by the emulator builder. However, the spectrusty-utils crate can help when dealing with keyboard events.
You may later check the implementation of this tutorial step1.rs or the examples directory of SPECTRUSTY repository to see how it can be done for SDL2 or a web browser.
Now let’s look inside our new ZxSpectrum’s methods:
// the type of PixelBuffer (so we can easily replace it).
type PixelBuf<'a> = PixelBufA24<'a>;
// the type of PixelBuffer::Pixel.
type Pixel<'a> = <PixelBuf<'a> as PixelBuffer<'a>>::Pixel;

impl<C: Cpu, M: ZxMemory> ZxSpectrum<C, M> {
    fn update_keyboard<F: FnOnce(ZXKeyboardMap) -> ZXKeyboardMap>(
            &mut self,
            update_keys: F)
    {
        let keymap = update_keys( self.ula.get_key_state() );
        self.ula.set_key_state(keymap);
    }
    // this one looks very simple, however we will add more to this
    // function later so let's not give up on it yet.
    fn run_frame(&mut self) {
        self.ula.execute_next_frame(&mut self.cpu);
    }
    // `buffer` is a mutable slice of bytes.
    // `pitch` is the number of bytes that the single row of pixels occupy.
    // `border` determines the size of the rendered screen.
    fn render_video<'a, P: Palette<Pixel=Pixel<'a>>>(
        &mut self,
        buffer: &mut [u8],
        pitch: usize,
        border: BorderSize)
    {
        self.ula.render_video_frame::<PixelBuf, P>(buffer, pitch, border);
    }
    // so we can reset our Spectrum
    fn reset(&mut self, hard: bool) {
        self.ula.reset(&mut self.cpu, hard)
    }
    // so we can trigger Non-Maskable Interrupt
    fn trigger_nmi(&mut self) -> bool {
        self.ula.nmi(&mut self.cpu)
    }
}
The Palette trait is for retrieving actual pixel colors corresponding to Spectrum’s color palette. You may define a palette implementation yourself or use one of the palettes defined in the video::pixel module. Remember that the associated Palette::Pixel type should match the type of PixelBuffer::Pixel.
The last missing part is synchronization. After each iteration of the emulator loop, it needs to pause the running thread for some time to match the rate of Spectrum’s CPU clock.
For this purpose, you can use ThreadSyncTimer:
// just one new import?
use spectrusty::chip::ThreadSyncTimer;

fn main() -> Result<()> {
    //... ✂
    //... later in main()

    let frame_duration_nanos =
        <UlaPAL<Memory16k> as HostConfig>::frame_duration_nanos();
    let mut sync = ThreadSyncTimer::new(frame_duration_nanos);
    let mut synchronize_frame = || {
        if let Err(missed) = sync.synchronize_thread_to_frame() {
            println!("*** lagging behind: {} frames ***", missed);
        }
    };

    while is_running() {
        //... ✂
        synchronize_frame();
    }
}
Assuming you have taken care of the host environment, this is enough to run your ZX Spectrum emulator. At this point, you should be able to write BASIC programs using a keyboard.
Some entropy
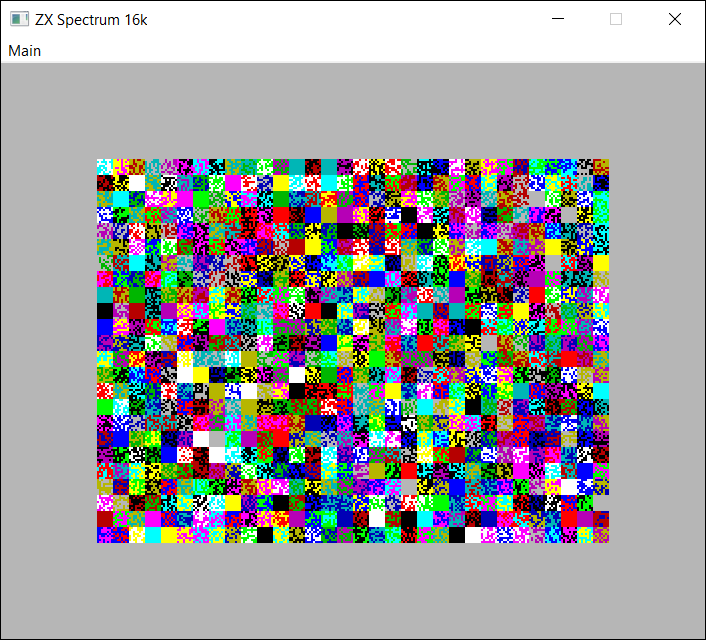
To make your Spectrum feel slightly more real, let’s initialize its memory with some randomness at boot time.
First, you need to add the rand crate to your Cargo.toml:
[dependencies]
spectrusty = "0.1"
rand = "0.7"
then add:
use rand::prelude::*;

fn main() -> Result<()> {
    //... ✂
    // some entropy in memory for nice visuals at boot
    spectrum.ula.memory_mut().fill_mem(.., random)?;
    // get the software
    let rom_file = std::fs::File::open("resources/roms/48.rom")?;
    // put the software into the hardware
    spectrum.ula.memory_mut().load_into_rom(rom_file)?;
    //... ✂
}
Generalized solution
Up to this moment, we assumed only one specific Spectrum type can be used in your program. What if you’d like to be able to switch the Spectrum model run-time?
For that, we’ll have to slightly pivot and embrace generics a little bit more. If you are new to Rust, it would be wise to read more about generic types now, here in this book.
First, let’s move out the emulator loop part to the separate, polymorphic function:
fn run<C: Cpu, M: ZxMemory>(
        spectrum: &mut ZxSpectrum<C, M>,
        env: HostEnvironment,
    ) -> Result<Action>
{
    let HostEnvironment { border, ... } = env;
    let (width, height) = <UlaPAL<M> as Video>::render_size_pixels(border);

    let mut sync = ThreadSyncTimer::new(
                    UlaPAL::<M>::frame_duration_nanos());
    let mut synchronize_frame = || {
        if let Err(missed) = sync.synchronize_thread_to_frame() {
            println!("*** paused for: {} frames ***", missed);
        }
    };

    // emulator main loop
    while is_running() {
        //... ✂
        if Some(model) = user_want_to_switch_model() {
            return Ok(Action::ChangeModel(model))
        }

        synchronize_frame();
    }

    Ok(Action::Exit)
}
The generic parameters are the same as used with the ZxSpectrum struct definition, so nothing interesting is happening yet.
Now, the HostEnvironment struct will wrap everything that is needed to run the emulator in the host environment. This includes a window handle, video buffer, audio host, event pump, etc. The new function accepts a mutable reference to the ZxSpectrum and returns an action request, which may look like this:
#[derive(Debug, Clone, Copy)]
enum Action {
    ChangeModel(ModelReq),
    Exit
}

#[derive(Debug, Clone, Copy)]
enum ModelReq {
    Spectrum16,
    Spectrum48,
}
In the main we need to add a loop that calls run and changes the model according to the request, or just exits the whole program:
    let mut spec16 = ZxSpectrum16k::<Z80NMOS>::default();
    //... ✂
    let mut spectrum = ZxSpectrumModel::Spectrum16(spec16);

    loop {
        use ZxSpectrumModel::*;
        let env = bundle_environment(/*...*/);
        let req = match &mut spectrum {
            Spectrum16(spec16) => run(spec16, env)?,
            Spectrum48(spec48) => run(spec48, env)?
        };

        spectrum = match req {
            Action::ChangeModel(spec) => spectrum.change_model(spec),
            Action::Exit => break
        };
    }
The only missing parts are the ZxSpectrumModel enum, which should be straightforward:
enum ZxSpectrumModel<C: Cpu> {
    Spectrum16(ZxSpectrum16k<C>),
    Spectrum48(ZxSpectrum48k<C>),
}
… and its implementation. Actually, we can make it a little more interesting by implementing model hot-swapping.
impl<C: Cpu> ZxSpectrumModel<C> {
    fn into_cpu(self) -> C {
        match self {
            ZxSpectrumModel::Spectrum16(spec16) => spec16.cpu,
            ZxSpectrumModel::Spectrum48(spec48) => spec48.cpu,
        }
    }
    fn as_mem_ref(&self) -> &[u8] {
        match self {
            ZxSpectrumModel::Spectrum16(spec16) =>
                    spec16.ula.memory_ref().mem_ref(),
            ZxSpectrumModel::Spectrum48(spec48) =>
                    spec48.ula.memory_ref().mem_ref(),
        }
    }
    fn border_color(&self) -> u8  {
        match self {
            ZxSpectrumModel::Spectrum16(spec16) =>
                            spec16.ula.border_color(),
            ZxSpectrumModel::Spectrum48(spec48) =>
                            spec48.ula.border_color(),
        }
    }
    // hot-swap hardware models
    fn change_model(self, request: ModelReq) -> Self {
        use ZxSpectrumModel::*;
        match (&self, request) {
            (Spectrum16(..), ModelReq::Spectrum16)|
            (Spectrum48(..), ModelReq::Spectrum48) => return self,
            _ => {}
        }
        let mem = self.as_mem_ref();
        let border = self.border_color();
        match request {
            ModelReq::Spectrum16 => {
                let mut spec16 = ZxSpectrum16k::<C>::default();
                let mem16 = spec16.ula.memory_mut().mem_mut();
                let len = mem16.len().min(mem.len());
                mem16[..len].copy_from_slice(&mem[..len]);
                spec16.cpu = self.into_cpu();
                spec16.ula.set_border_color(border);
                Spectrum16(spec16)
            }
            ModelReq::Spectrum48 => {
                let mut spec48 = ZxSpectrum48k::<C>::default();
                let mem48 = spec48.ula.memory_mut().mem_mut();
                let len = mem48.len().min(mem.len());
                mem48[..len].copy_from_slice(&mem[..len]);
                spec48.cpu = self.into_cpu();
                spec48.ula.set_border_color(border);
                Spectrum48(spec48)
            }
        }
    }
}
I think that’s enough for this step. More models will come in the future, and we’ll extend the run function yet many times over, that’s for sure. Just stay with me for a little bit longer.
Example
The example program using minifb and covering the scope of this tutorial can be run with:
cargo run --bin step1 --release
Next
Back to index.